跳到主要內容

[bitnami]設定固定ip


  • Log in to the server console.

  • Obtain the network interface name using the command below. Typically, the interface name is of the form enXXXX. Note the virtual machine’s IP address associated with the interface.
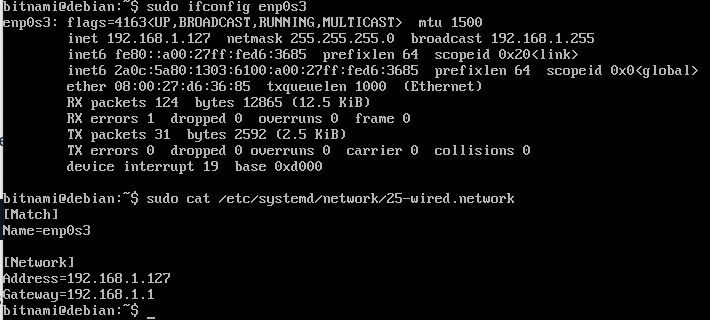
    sudo ifconfig
    
  • Create a configuration file for the network interface by copying an existing configuration file and placing it in the /etc/systemd/network directory. In this example, assume that the new configuration file is named 25-wired.network:

    cd /etc/systemd/network
    sudo cp 99-dhcp.network 25-wired.network
    
  • Edit the new configuration file and update it to look like the configuration below. Replace the INTERFACE-NAME, HOST-IP-ADDRESS and GATEWAY-IP-ADDRESS placeholders with the name of the network interface, the host IP address obtained previously, and the gateway IP address, as shown in the example.

      [Match]
      Name=INTERFACE-NAME
    
      [Network]
      Address=HOST-IP-ADDRESS
      Gateway=GATEWAY-IP-ADDRESS
    

    Here is an example screenshot:

    Address configuration

  • Save your changes and restart the virtual machine for the changes to take effect.

https://docs.bitnami.com/virtual-machine/faq/configuration/configure-static-address/

留言

這個網誌中的熱門文章

[經驗分享]開源IT資產管理系統 - Open-AudIT

企業營運必定與電腦系統脫離不了關係,每一部電腦散落在各部門、各辦公室,若是較具規模的公司,甚至會有跨好幾個地區的辦公室存在。 from Pocket http://ift.tt/2sI5nuB via IFTTT

RegistryChangesView 登錄檔比對工具,挖出某個設定修改了什麼..

在 Windows 電腦中,很多軟體在安裝/移除或執行時會在系統的「登錄檔」資料庫裡面加入、移除或修改許多項目,有些有修改是必須的,有些修改沒弄好的話可能會造成一些問題導致某些功能不正常或系統不穩定等等情況。 from Pocket http://ift.tt/2wiZCWi via IFTTT

Sonoff Zigbee 3.0 USB Dongle Plus燒錄ZigBee Router 模式

前言       Sonoff Zigbee 3.0 USB Dongle Plus燒錄為ZigBee Router 模式,可加以延伸ZigBee訊息(提供給ZHA 或Zigbee2MQTT) 1.下載韌體 https://github.com/Koenkk/Z-Stack-firmware/raw/master/router/Z-Stack_3.x.0/bin/CC1352P2_CC2652P_launchpad_router_20220125.zip 2.下載燒錄軟體(FLASH-PROGRAMMER-2 — SmartRF Flash Programmer v2) 要註冊才能下載 https://www.ti.com/tool/FLASH-PROGRAMMER 3.拆除Sonoff Zigbee 3.0 USB Dongle Plus外殼,按住靠近USB的按鈕不放,插入電腦USB後,等待10秒後,再放開 4.開啟燒錄軟體     點選COM Port(Unknow)- > CC2652P -> 勾選 Erase + Program -> Play(燒錄)     如果遇到失敗,大部份是步驟3沒做好,再重新拔插一下 5.如果看到成功,就大功告成了,開啟 ZHA 或Zigbee2MQTT配對模式後,就可以看到它了。 註:目前不知道如何重新配對,我都是執行重新燒錄動作 參考文章 https://forum.automata.id/t/topic/247 https://github.com/Koenkk/Z-Stack-firmware/raw/master/router/Z-Stack_3.x.0/